By: CS2103AUG2017-T09-B2 Since: AUG 2017 Licence: MIT
- 1. Introduction
- 2. Contribution
- 3. Setting up
- 4. Design
- 5. Implementation
- 5.1. Undo/Redo mechanism
- 5.2. Logging
- 5.3. Configuration
- 5.4. Implementing Meeting Class
- 5.5. Add Meeting
- 5.6. Delete Meeting
- 5.7. List Meeting
- 5.8. Find Meeting
- 5.9. Find Exact Meeting
- 5.10. Edit Meeting
- 5.11. Edit Meeting
- 5.12. Select Meeting
- 5.13. Meeting Card
- 5.14. Meeting pop up reminder
- 5.15. Automatic Deletions of Meetings
- 6. Documentation
- 7. Testing
- 8. Dev Ops
- Appendix A: Suggested Programming Tasks to Get Started
- Appendix B: User Stories
- Appendix C: Use Cases
- Appendix D: Non Functional Requirements
- Appendix E: Glossary
- Appendix F: Product Survey
1. Introduction
Welcome to ScheduBook! The aim of ScheduBook is to allow users with busy and hectic schedules to better plan meetings and be reminded of high priority meetings, in addition to the conventional AddressBook functionalities. Upon starting the application, a Graphical User Interface that is completely functional using a command-line interface will be launched.
This developer guide is intended get you up-and-running with our application. We will cover everything you need to know, from setting up, to the implementation of commands, to troubleshooting testing. This guide is written in a top-down approach which will help you to better understand the overall design before diving into the detailed explanation of each component.
2. Contribution
There are plenty of ways for you to contribute to this project such as (list is not exhaustive):
-
Implementing new features
-
Enhancing overall code quality
-
Integrating external Application Programming Interfaces(API)
-
Testing of codes
You do not have to worry about being an inexperienced programmer as this guide will not only will help you to get started as a ScheduBook contributor, but also allow you to learn and understand the basic concepts behind Object-oriented programming(OOP) in Java.
3. Setting up
3.1. Prerequisites
-
JDK
1.8.0_60or laterHaving any Java 8 version is not enough.
This app will not work with earlier versions of Java 8. -
IntelliJ IDE
IntelliJ by default has Gradle and JavaFx plugins installed.
Do not disable them. If you have disabled them, go toFile>Settings>Pluginsto re-enable them.
3.2. Setting up the project in your computer
-
Fork this repo, and clone the fork to your computer
-
Open IntelliJ (if you are not in the welcome screen, click
File>Close Projectto close the existing project dialog first) -
Set up the correct JDK version for Gradle
-
Click
Configure>Project Defaults>Project Structure -
Click
New…and find the directory of the JDK
-
-
Click
Import Project -
Locate the
build.gradlefile and select it. ClickOK -
Click
Open as Project -
Click
OKto accept the default settings -
Open a console and run the command
gradlew processResources(Mac/Linux:./gradlew processResources). It should finish with theBUILD SUCCESSFULmessage.
This will generate all resources required by the application and tests.
3.3. Verifying the setup
-
Run the
seedu.address.MainAppand try a few commands -
Run the tests to ensure they all pass.
3.4. Configurations to do before writing code
3.4.1. Configuring the coding style
This project follows oss-generic coding standards. IntelliJ’s default style is mostly compliant with ours but it uses a different import order from ours. To rectify,
-
Go to
File>Settings…(Windows/Linux), orIntelliJ IDEA>Preferences…(macOS) -
Select
Editor>Code Style>Java -
Click on the
Importstab to set the order-
For
Class count to use import with '*'andNames count to use static import with '*': Set to999to prevent IntelliJ from contracting the import statements -
For
Import Layout: The order isimport static all other imports,import java.*,import javax.*,import org.*,import com.*,import all other imports. Add a<blank line>between eachimport
-
Optionally, you can follow the UsingCheckstyle.adoc document to configure Intellij to check style-compliance as you write code.
3.4.2. Updating documentation to match your fork
After forking the repo, links in the documentation will still point to the se-edu/addressbook-level4 repo. If you plan to develop this as a separate product (i.e. instead of contributing to the se-edu/addressbook-level4) , you should replace the URL in the variable repoURL in DeveloperGuide.adoc and UserGuide.adoc with the URL of your fork.
3.4.3. Setting up CI
Set up Travis to perform Continuous Integration (CI) for your fork. See UsingTravis.adoc to learn how to set it up.
Optionally, you can set up AppVeyor as a second CI (see UsingAppVeyor.adoc).
| Having both Travis and AppVeyor ensures your App works on both Unix-based platforms and Windows-based platforms (Travis is Unix-based and AppVeyor is Windows-based) |
3.4.4. Getting started with coding
When you are ready to start coding,
-
Get some sense of the overall design by reading the Architecture section.
-
Take a look at the section Suggested Programming Tasks to Get Started.
4. Design
4.1. Architecture
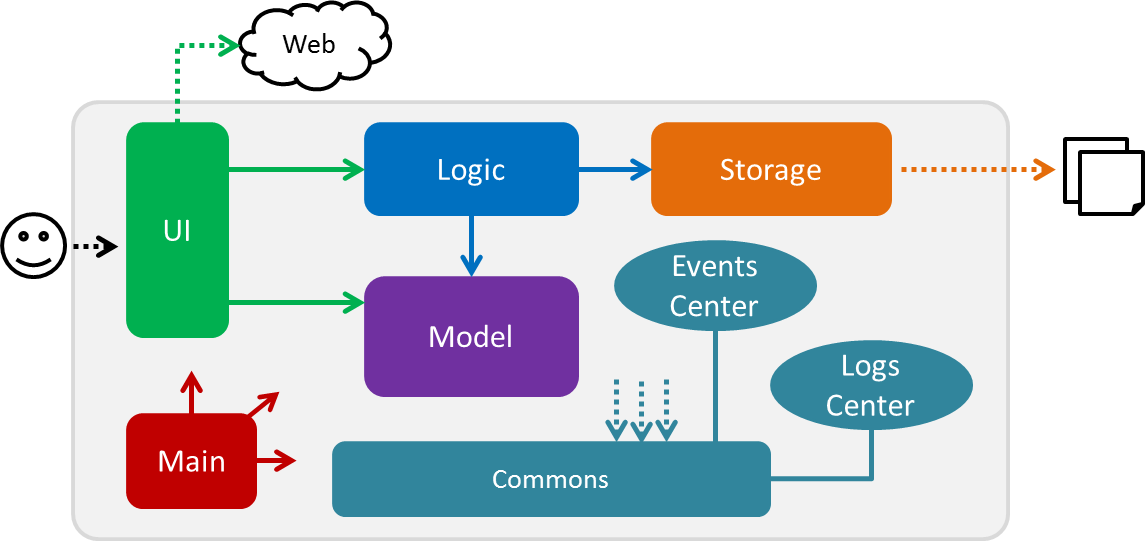
Figure 4.1.1 : Architecture Diagram
The Architecture Diagram given above explains the high-level design of the App. Given below is a quick overview of each component.
The .pptx files used to create diagrams in this document can be found in the diagrams folder. To update a diagram, modify the diagram in the pptx file, select the objects of the diagram, and choose Save as picture.
|
Main has only one class called MainApp. It is responsible for,
-
At app launch: Initializes the components in the correct sequence, and connects them up with each other.
-
At shut down: Shuts down the components and invokes cleanup method where necessary.
Commons represents a collection of classes used by multiple other components. Two of those classes play important roles at the architecture level.
-
EventsCenter: This class (written using Google’s Event Bus library) is used by components to communicate with other components using events (i.e. a form of Event Driven design) -
LogsCenter: Used by many classes to write log messages to the App’s log file.
The rest of the App consists of four components.
Each of the four components
-
Defines its API in an
interfacewith the same name as the Component. -
Exposes its functionality using a
{Component Name}Managerclass.
For example, the Logic component (see the class diagram given below) defines it’s API in the Logic.java interface and exposes its functionality using the LogicManager.java class.
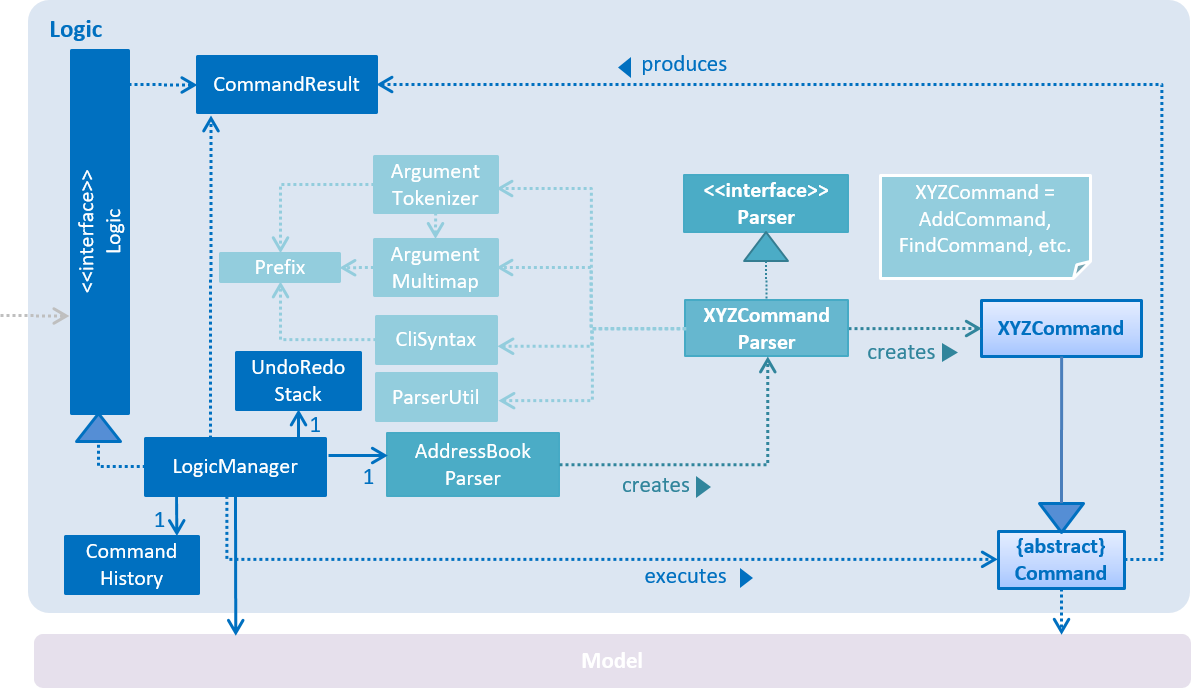
Figure 4.1.2 : Class Diagram of the Logic Component
Events-Driven nature of the design
The Sequence Diagram below shows how the components interact for the scenario where the user issues the command delete 1.
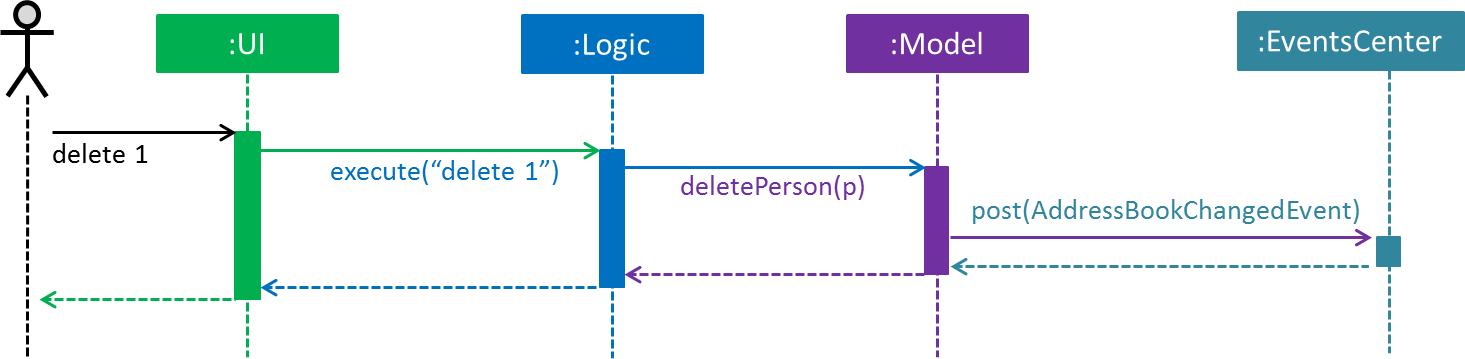
Figure 4.1.3a : Component interactions for delete 1 command (part 1)
Note how the Model simply raises a AddressBookChangedEvent when the Address Book data are changed, instead of asking the Storage to save the updates to the hard disk.
|
The diagram below shows how the EventsCenter reacts to that event, which eventually results in the updates being saved to the hard disk and the status bar of the UI being updated to reflect the 'Last Updated' time.
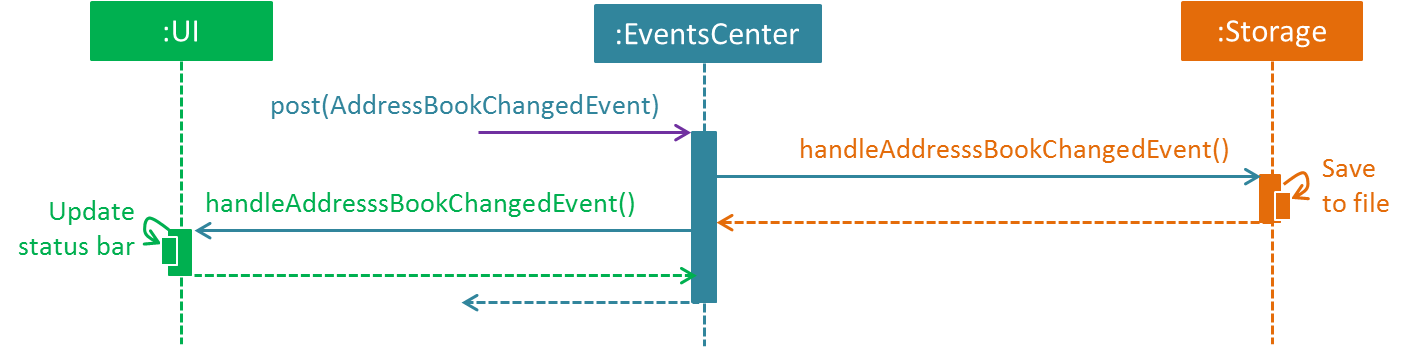
Figure 4.1.3b : Component interactions for delete 1 command (part 2)
Note how the event is propagated through the EventsCenter to the Storage and UI without Model having to be coupled to either of them. This is an example of how this Event Driven approach helps us reduce direct coupling between components.
|
The sections below give more details of each component.
4.2. UI component
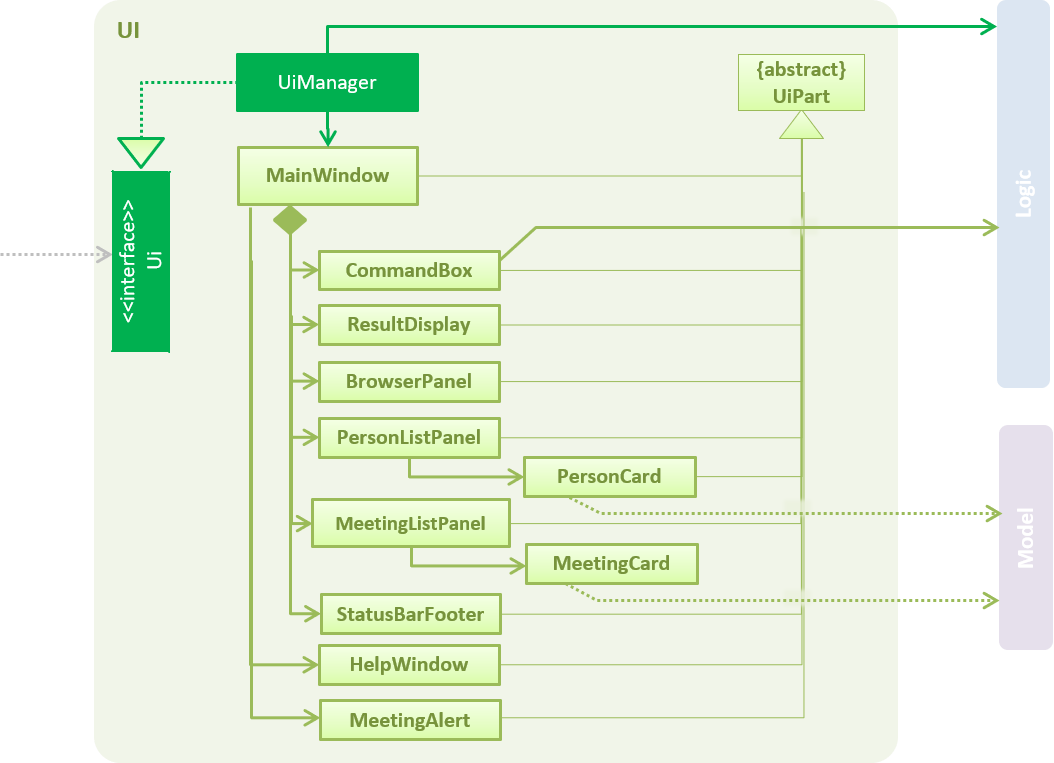
Figure 4.2.1 : Structure of the UI Component
API : Ui.java
The UI consists of a MainWindow that is made up of parts e.g.CommandBox, ResultDisplay, PersonListPanel, MeetingListPanel, StatusBarFooter, BrowserPanel etc. All these, including the MainWindow, inherit from the abstract UiPart class.
The UI component uses JavaFx UI framework. The layout of these UI parts are defined in matching .fxml files that are in the src/main/resources/view folder. For example, the layout of the MainWindow is specified in MainWindow.fxml
The UI component,
-
Executes user commands using the
Logiccomponent. -
Binds itself to some data in the
Modelso that the UI can auto-update when data in theModelchange. -
Responds to events raised from various parts of the App and updates the UI accordingly.
4.3. Logic component
Figure 4.3.1 : Structure of the Logic Component
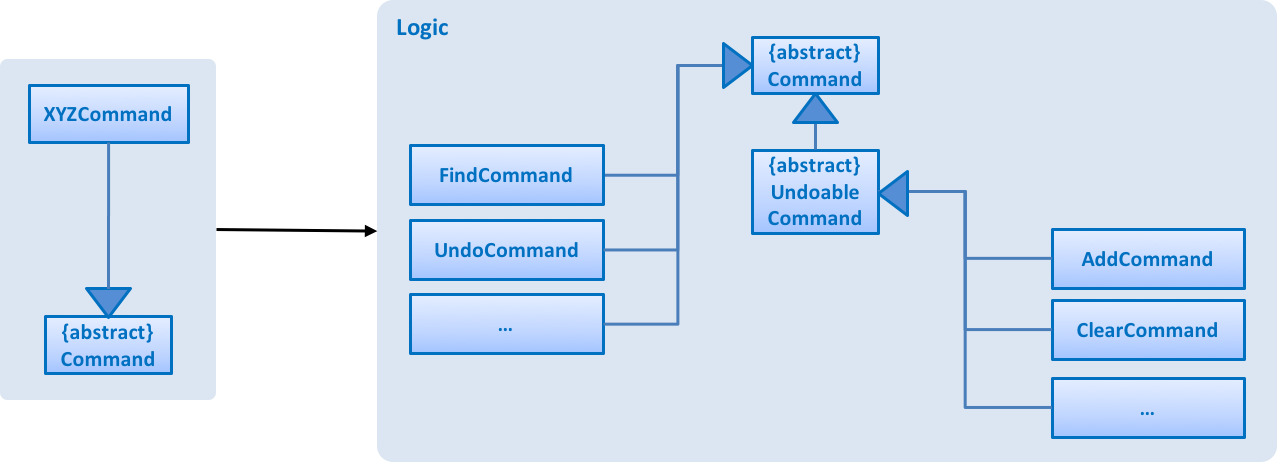
Figure 4.3.2 : Structure of Commands in the Logic Component. This diagram shows finer details concerning XYZCommand and Command in Figure 2.3.1
API :
Logic.java
-
Logicuses theAddressBookParserclass to parse the user command. -
This results in a
Commandobject which is executed by theLogicManager. -
The command execution can affect the
Model(e.g. adding a person) and/or raise events. -
The result of the command execution is encapsulated as a
CommandResultobject which is passed back to theUi.
Given below is the Sequence Diagram for interactions within the Logic component for the execute("delete 1") API call.
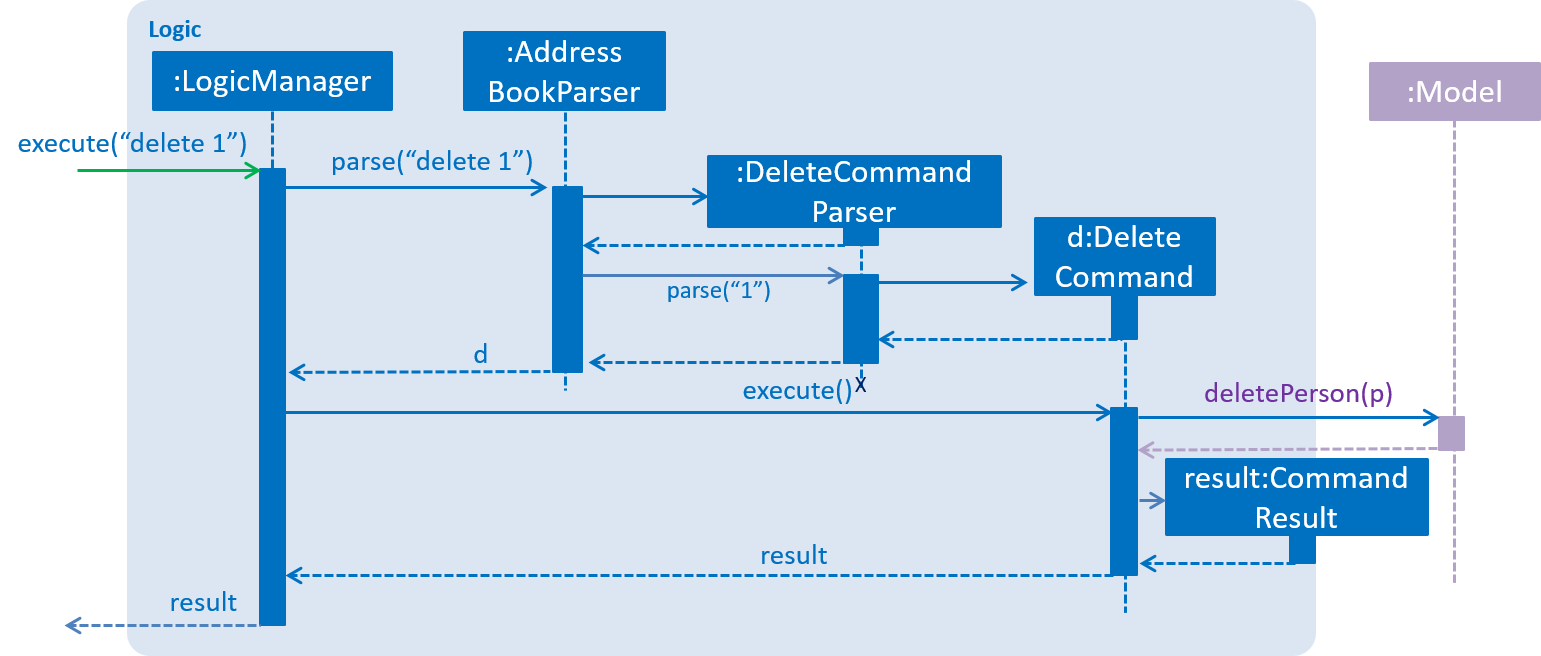
Figure 4.3.1 : Interactions Inside the Logic Component for the delete 1 Command
4.4. Model component
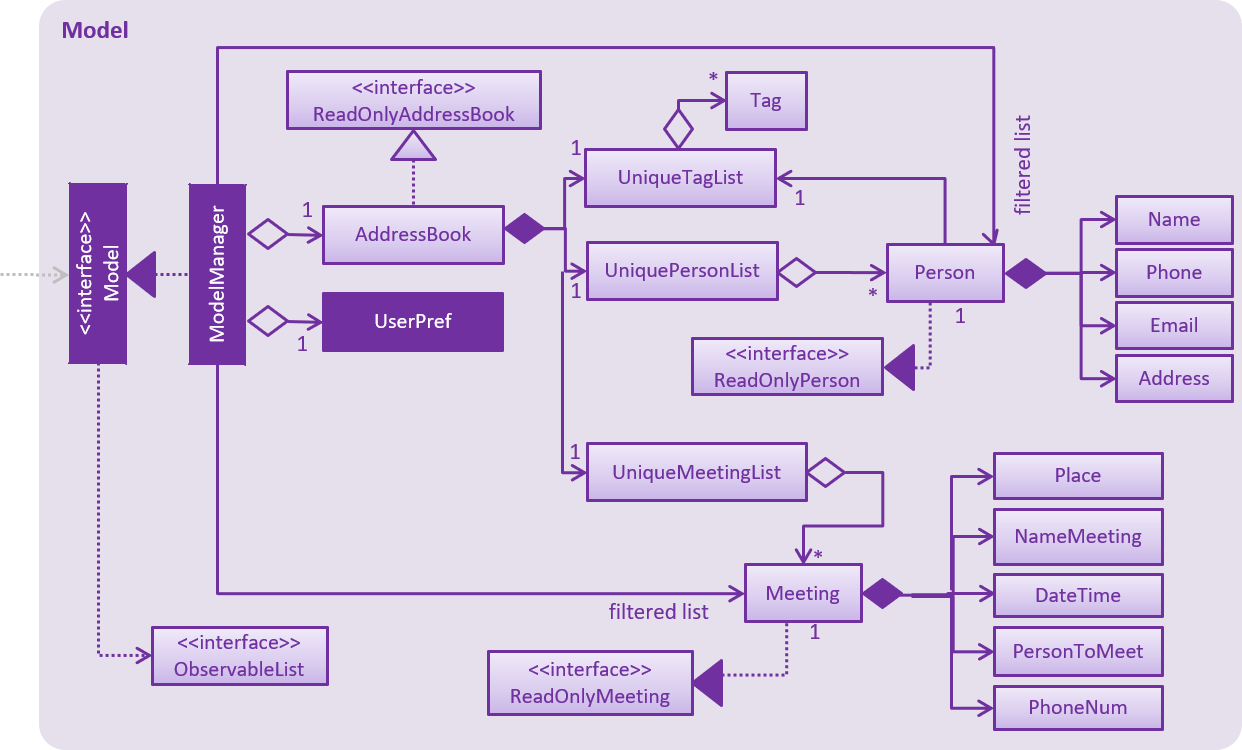
Figure 4.4.1 : Structure of the Model Component
API : Model.java
The Model,
-
stores a
UserPrefobject that represents the user’s preferences. -
stores the Address Book data.
-
exposes an unmodifiable
ObservableList<ReadOnlyPerson>andObservableList<ReadOnlyMeeting>that can be 'observed' e.g. the UI can be bound to this list so that the UI automatically updates when the data in the list change. -
does not depend on any of the other three components.
4.5. Storage component
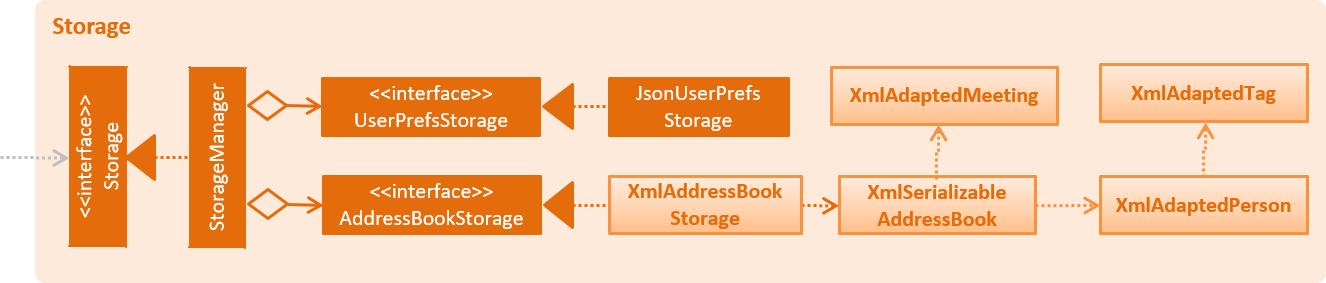
Figure 4.5.1 : Structure of the Storage Component
API : Storage.java
The Storage component,
-
can save
UserPrefobjects in json format and read it back. -
can save the Address Book data in xml format and read it back.
4.6. Common classes
Classes used by multiple components are in the seedu.addressbook.commons package.
5. Implementation
This section describes some noteworthy details on how certain features are implemented.
5.1. Undo/Redo mechanism
The undo/redo mechanism is facilitated by an UndoRedoStack, which resides inside LogicManager. It supports undoing and redoing of commands that modifies the state of the address book (e.g. add, edit). Such commands will inherit from UndoableCommand.
UndoRedoStack only deals with UndoableCommands. Commands that cannot be undone will inherit from Command instead. The following diagram shows the inheritance diagram for commands:
Figure 5.1.1 : Inheritance Diagram for commands
As you can see from the diagram, UndoableCommand adds an extra layer between the abstract Command class and concrete commands that can be undone, such as the DeleteCommand. Note that extra tasks need to be done when executing a command in an undoable way, such as saving the state of the address book before execution. UndoableCommand contains the high-level algorithm for those extra tasks while the child classes implements the details of how to execute the specific command. Note that this technique of putting the high-level algorithm in the parent class and lower-level steps of the algorithm in child classes is also known as the template pattern.
Commands that are not undoable are implemented this way:
public class ListCommand extends Command {
    @Override
    public CommandResult execute() {
        // ... list logic ...
    }
}
With the extra layer, the commands that are undoable are implemented this way:
public abstract class UndoableCommand extends Command {
    @Override
    public CommandResult execute() {
        // ... undo logic ...

        executeUndoableCommand();
    }
}

public class DeleteCommand extends UndoableCommand {
    @Override
    public CommandResult executeUndoableCommand() {
        // ... delete logic ...
    }
}
Suppose that the user has just launched the application. The UndoRedoStack will be empty at the beginning.
The user executes a new UndoableCommand, delete 5, to delete the 5th person in the address book. The current state of the address book is saved before the delete 5 command executes. The delete 5 command will then be pushed onto the undoStack (the current state is saved together with the command).
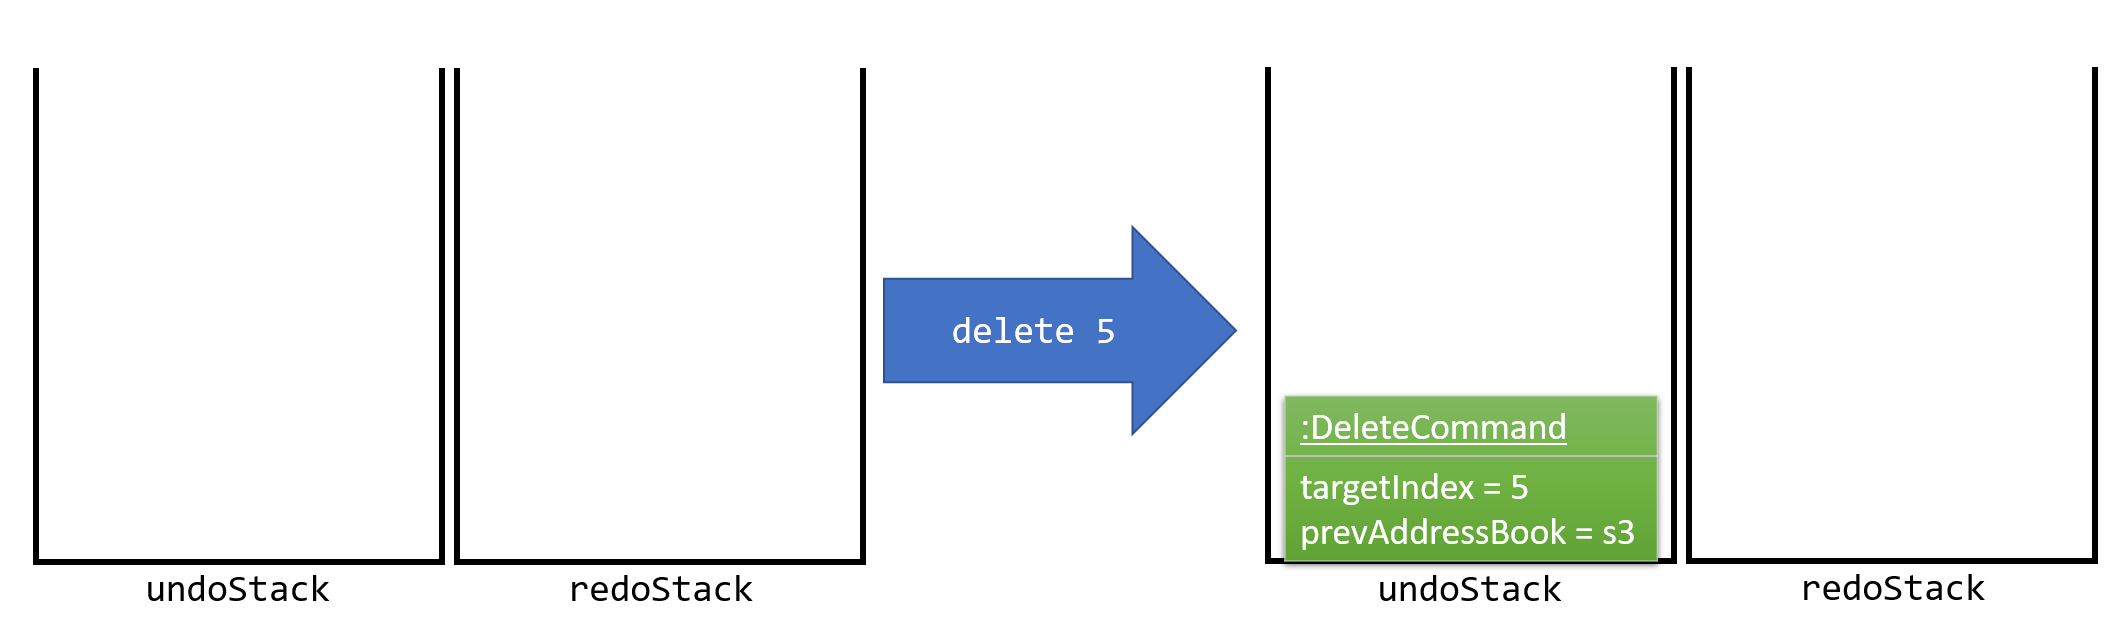
Figure 5.1.2 : Diagram to show stack
As the user continues to use the program, more commands are added into the undoStack. For example, the user may execute add n/David … to add a new person.
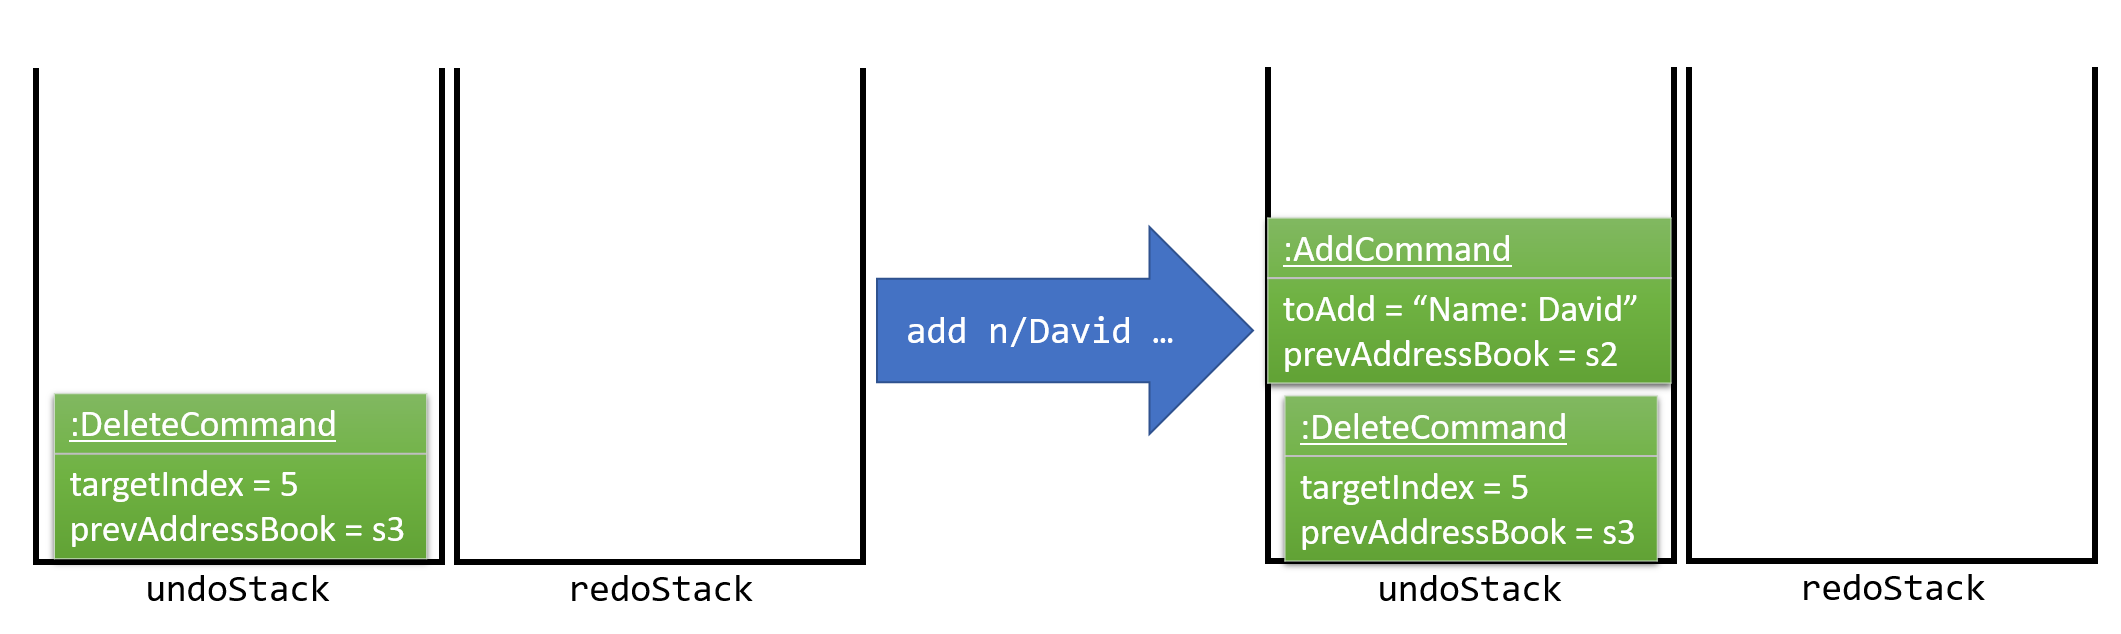
Figure 5.1.3 : Diagram to show stack with another command
If a command fails its execution, it will not be pushed to the UndoRedoStack at all.
|
The user now decides that adding the person was a mistake, and decides to undo that action using undo.
We will pop the most recent command out of the undoStack and push it back to the redoStack. We will restore the address book to the state before the add command executed.
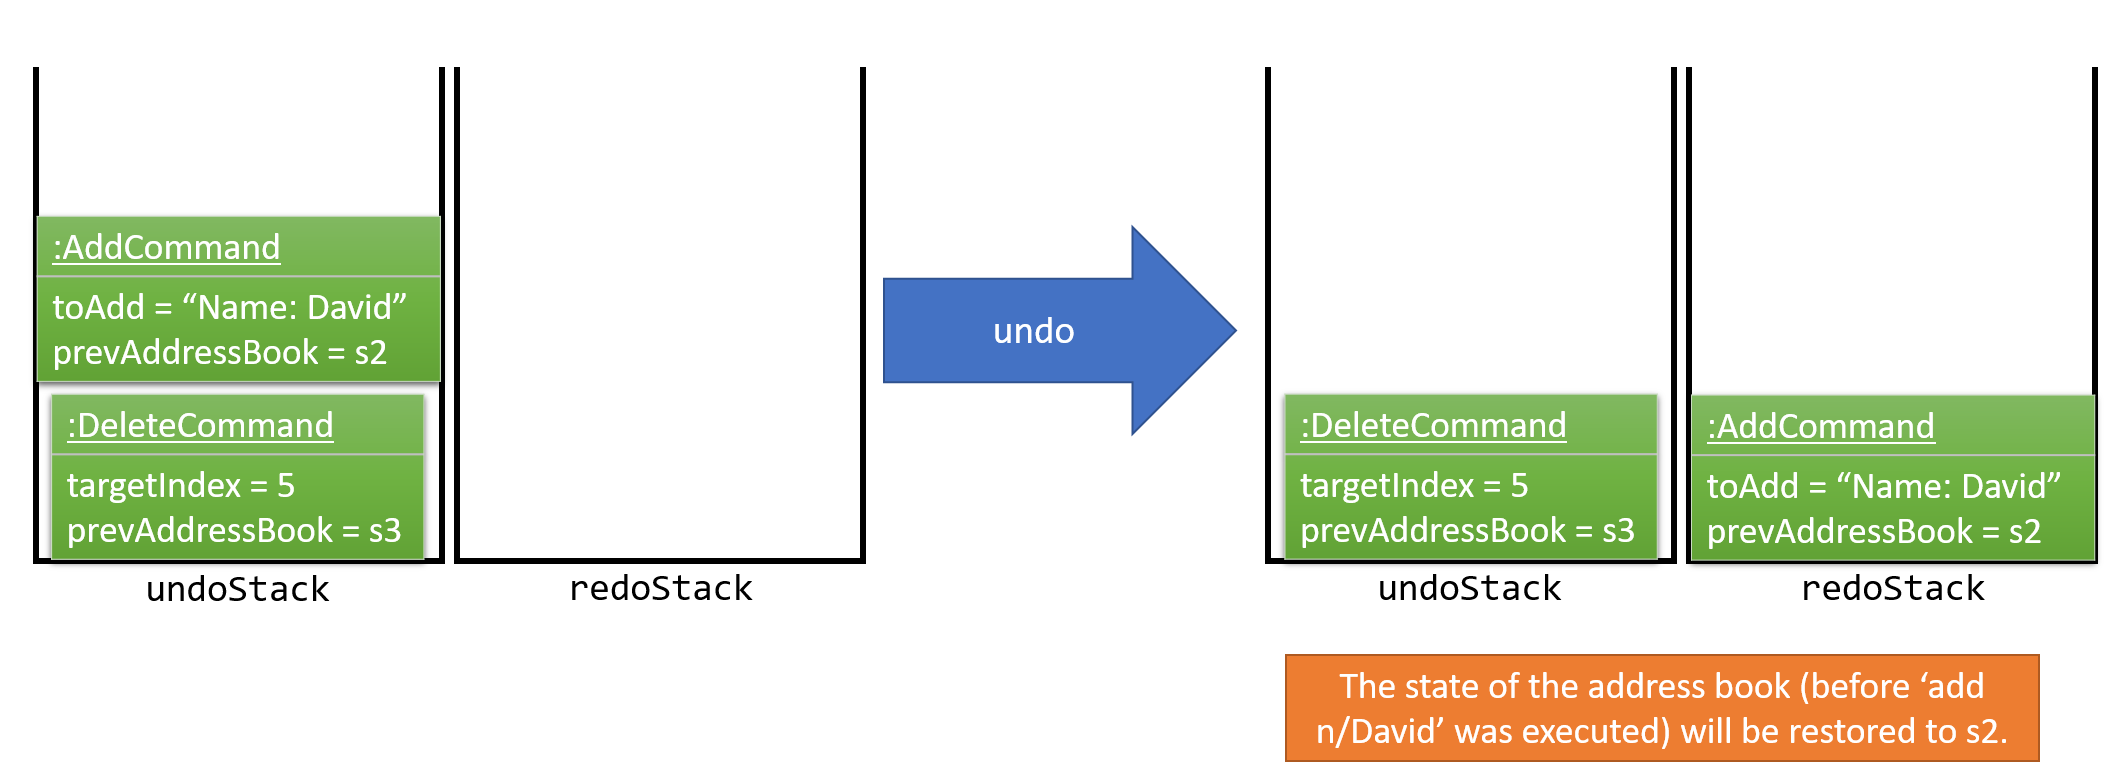
Figure 5.1.3 : Diagram to show how undo works
If the undoStack is empty, then there are no other commands left to be undone, and an Exception will be thrown when popping the undoStack.
|
The following sequence diagram shows how the undo operation works:
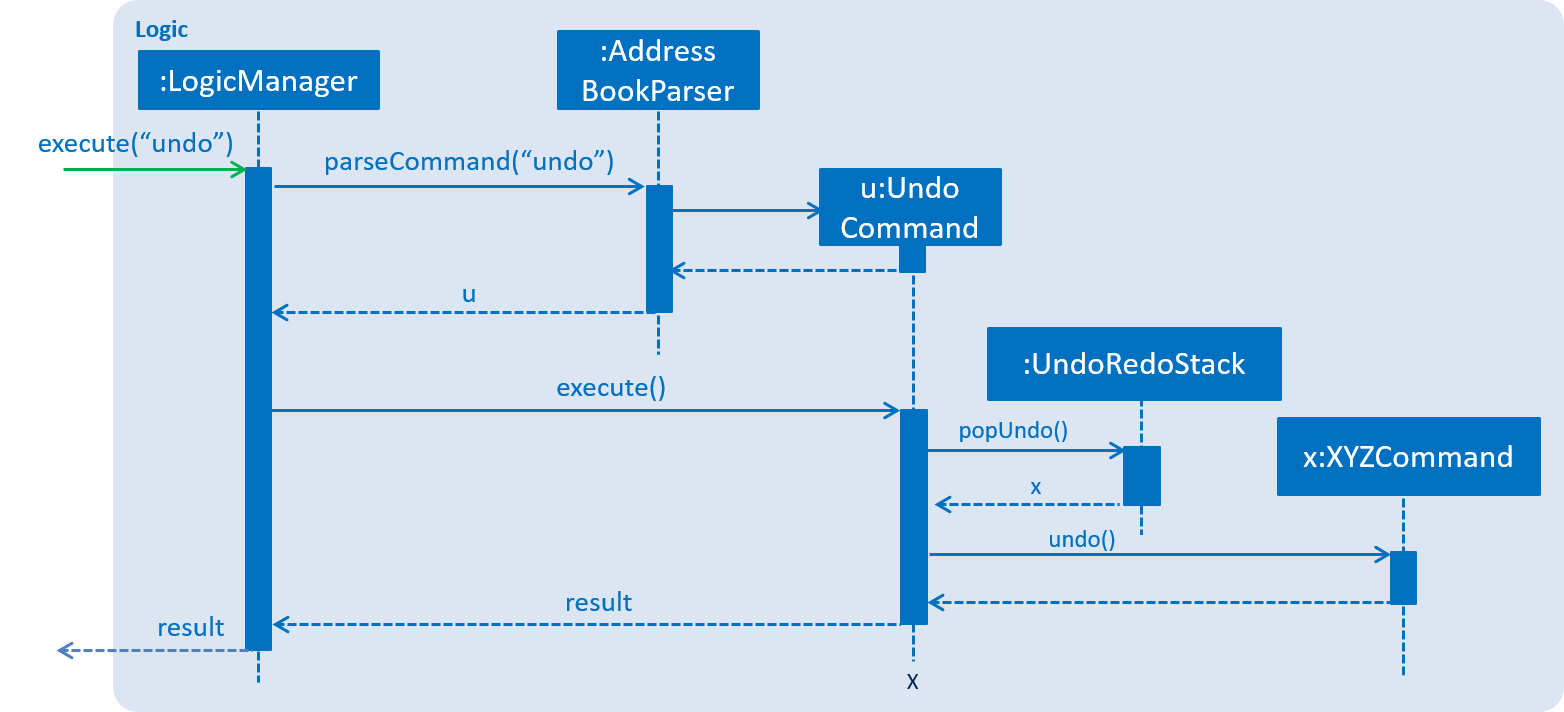
Figure 5.1.4 : Sequence diagram for undo
The redo does the exact opposite (pops from redoStack, push to undoStack, and restores the address book to the state after the command is executed).
If the redoStack is empty, then there are no other commands left to be redone, and an Exception will be thrown when popping the redoStack.
|
The user now decides to execute a new command, clear. As before, clear will be pushed into the undoStack. This time the redoStack is no longer empty. It will be purged as it no longer make sense to redo the add n/David command (this is the behavior that most modern desktop applications follow).
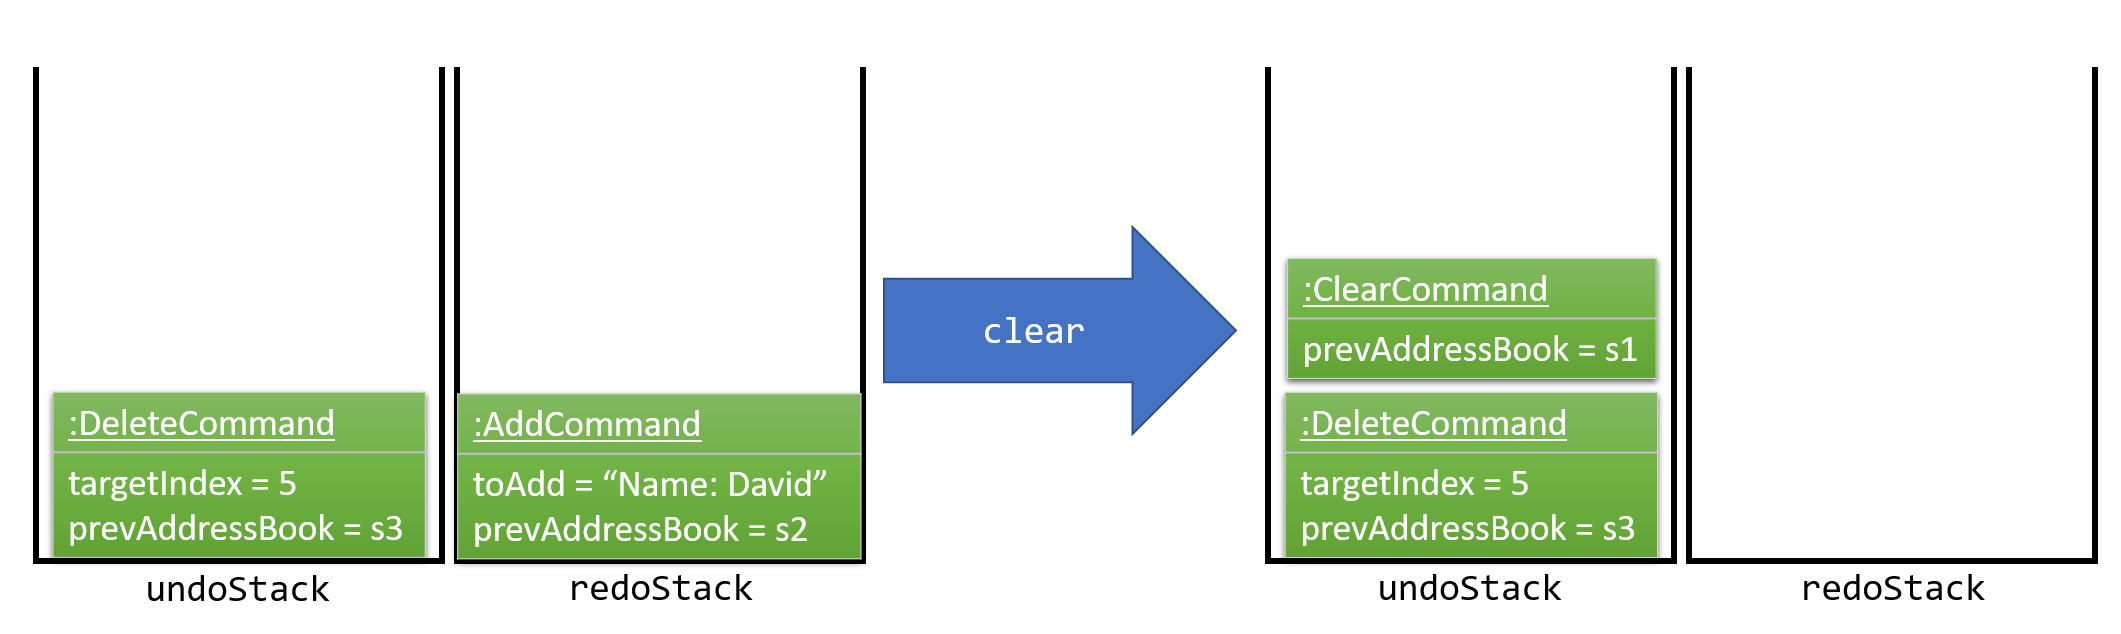
Figure 5.1.5 : Diagram to show stack with more commands
Commands that are not undoable are not added into the undoStack. For example, list, which inherits from Command rather than UndoableCommand, will not be added after execution:
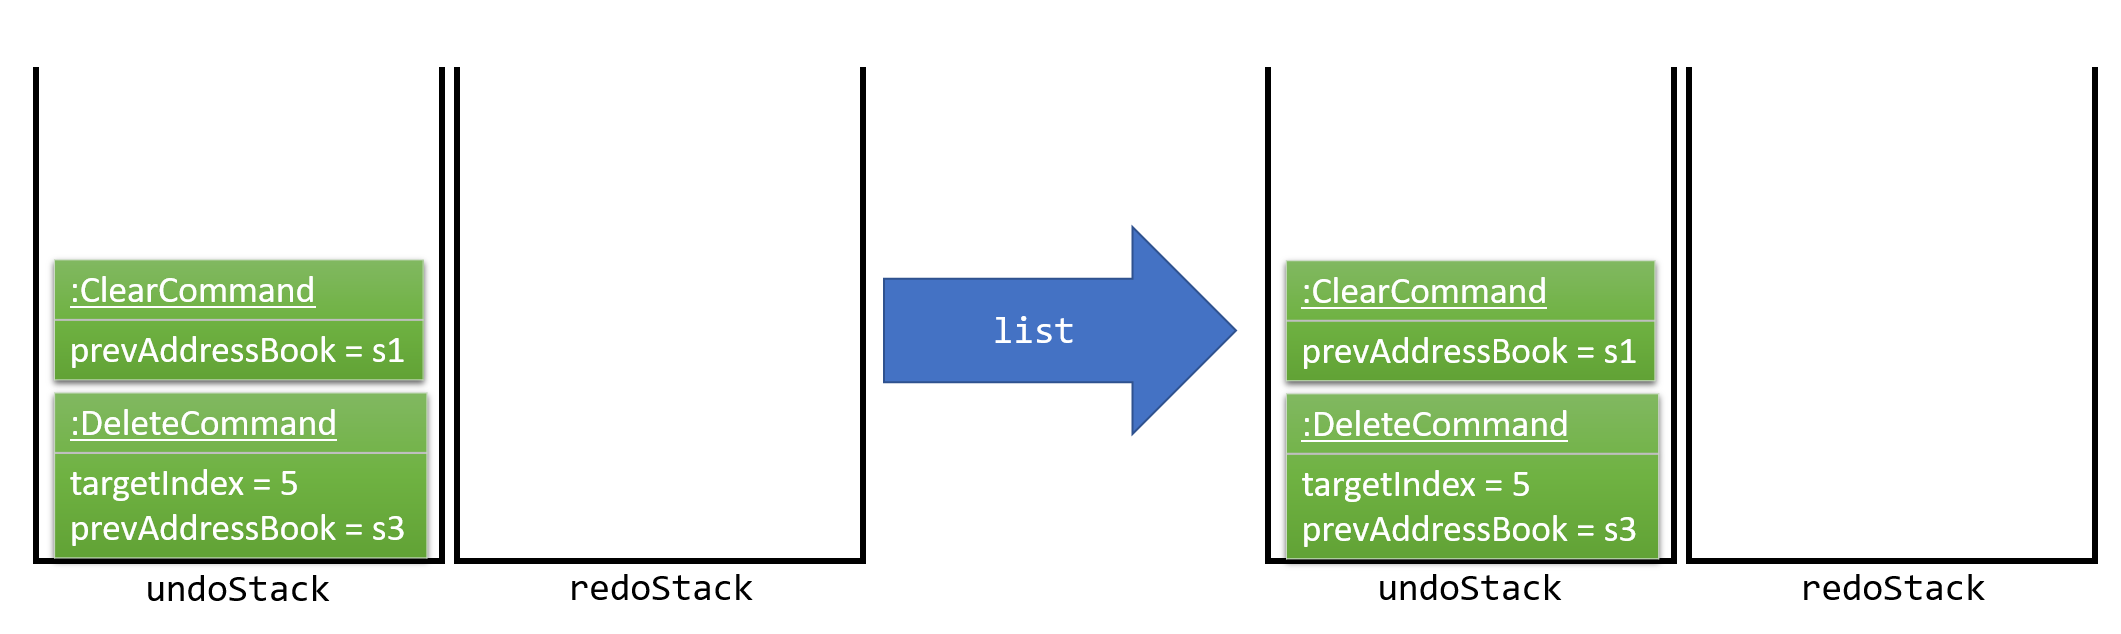
Figure 5.1.6 : Diagram to show undoable command not added to stack
The following activity diagram summarize what happens inside the UndoRedoStack when a user executes a new command:
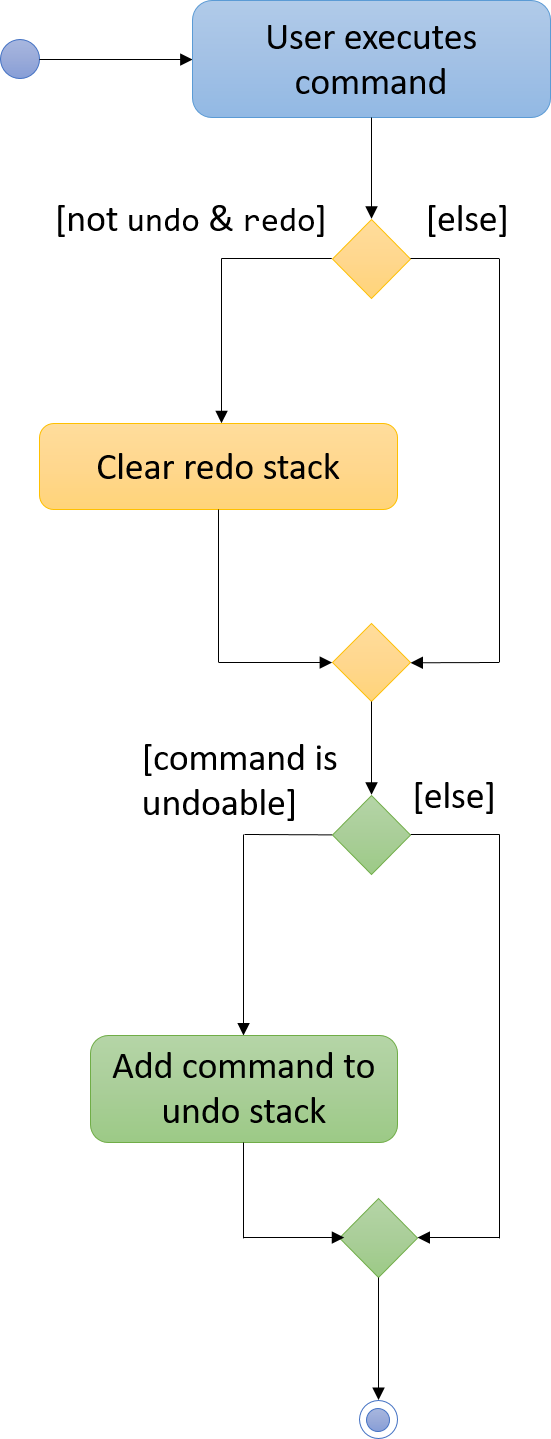
Figure 5.1.7 : Activity diagram to show UndoRedoStack
5.1.1. Design Considerations
Aspect: Implementation of UndoableCommand
Alternative 1 (current choice): Add a new abstract method executeUndoableCommand()
Pros: We will not lose any undone/redone functionality as it is now part of the default behaviour. Classes that deal with Command do not have to know that executeUndoableCommand() exist.
Cons: Hard for new developers to understand the template pattern.
Alternative 2: Just override execute()
Pros: Does not involve the template pattern, easier for new developers to understand.
Cons: Classes that inherit from UndoableCommand must remember to call super.execute(), or lose the ability to undo/redo.
Aspect: How undo & redo executes
Alternative 1 (current choice): Saves the entire address book.
Pros: Easy to implement.
Cons: May have performance issues in terms of memory usage.
Alternative 2: Individual command knows how to undo/redo by itself.
Pros: Will use less memory (e.g. for delete, just save the person being deleted).
Cons: We must ensure that the implementation of each individual command are correct.
Aspect: Type of commands that can be undone/redone
Alternative 1 (current choice): Only include commands that modifies the address book (add, clear, edit).
Pros: We only revert changes that are hard to change back (the view can easily be re-modified as no data are lost).
Cons: User might think that undo also applies when the list is modified (undoing filtering for example), only to realize that it does not do that, after executing undo.
Alternative 2: Include all commands.
Pros: Might be more intuitive for the user.
Cons: User have no way of skipping such commands if he or she just want to reset the state of the address book and not the view.
Additional Info: See our discussion here.
Aspect: Data structure to support the undo/redo commands
Alternative 1 (current choice): Use separate stack for undo and redo
Pros: Easy to understand for new Computer Science student undergraduates to understand, who are likely to be the new incoming developers of our project.
Cons: Logic is duplicated twice. For example, when a new command is executed, we must remember to update both HistoryManager and UndoRedoStack.
Alternative 2: Use HistoryManager for undo/redo
Pros: We do not need to maintain a separate stack, and just reuse what is already in the codebase.
Cons: Requires dealing with commands that have already been undone: We must remember to skip these commands. Violates Single Responsibility Principle and Separation of Concerns as HistoryManager now needs to do two different things.
5.2. Logging
We are using java.util.logging package for logging. The LogsCenter class is used to manage the logging levels and logging destinations.
-
The logging level can be controlled using the
logLevelsetting in the configuration file (See Configuration) -
The
Loggerfor a class can be obtained usingLogsCenter.getLogger(Class)which will log messages according to the specified logging level -
Currently log messages are output through:
Consoleand to a.logfile.
Logging Levels
-
SEVERE: Critical problem detected which may possibly cause the termination of the application -
WARNING: Can continue, but with caution -
INFO: Information showing the noteworthy actions by the App -
FINE: Details that is not usually noteworthy but may be useful in debugging e.g. print the actual list instead of just its size
5.3. Configuration
Certain properties of the application can be controlled (e.g App name, logging level) through the configuration file (default: config.json).
5.4. Implementing Meeting Class
The Meeting class is a new class just like the Person class, which resides inside model. It features commands that modifies the state of the address book
such as addmeeting, deletemeeting, editmeeting, listmeeting and findmeeting.
The attributes of Meeting class include NameMeeting, DateTime, Place, Persons and MeetingTag, as seen in the figure below.

Figure 5.4.1 Meeting Class
Persons are ReadOnlyPerson class from the contact list added by the users. In this meeting class, List<ReadOnlyPerson> personsToMeet are an object inside Meeting class which stores the information of the persons inside the class itself.
5.4.1. Design Considerations
Aspect: Creation of Meeting class
Alternative 1 (current choice): Input a person class in Meeting class to retrieve their name and phone number
Pros: Allows developers to be more flexible to implement with meeting class, also simplify the creation of group meetings
Cons: It is difficult to implement.
Alternative 2: Meeting class that is created with 'PersonToMeet' and 'PhoneNum' class
Pros: Easy to implement
Cons: More codes for developers to write and change.
5.5. Add Meeting
The add meeting command inherits from UndoableCommand which allows user to add meeting with the following parameters: 'INDEX' of person in the last person listing, 'Name' of Meeting, 'Date and Time' of Meeting, 'Location' of Meeting, and lastly, 'Importance' of Meeting.
Implementation:
When the addmeeting command is called with the appropriate parameters, an instance of the Meeting object is created with the
corresponding parameters. For example,
addmeeting 7 n/Shopping d/31-10-2017 16:00 l/Hillion Mall t/1Creates an object with the following parameters
MeetingName: Shopping
DateTime: 31-10-2017 16:00
PersonName: Alex Yeo
PhoneNum: 87438807
Location: Hillion Mall
MeetingTag: 1
Furthermore, the INDEX of person provided would allow the newly-created Meeting object to get the name as well as phone number
of the corresponding contact as shown in the example above.
The following sequence diagram below shows how AddMeeting operation works:
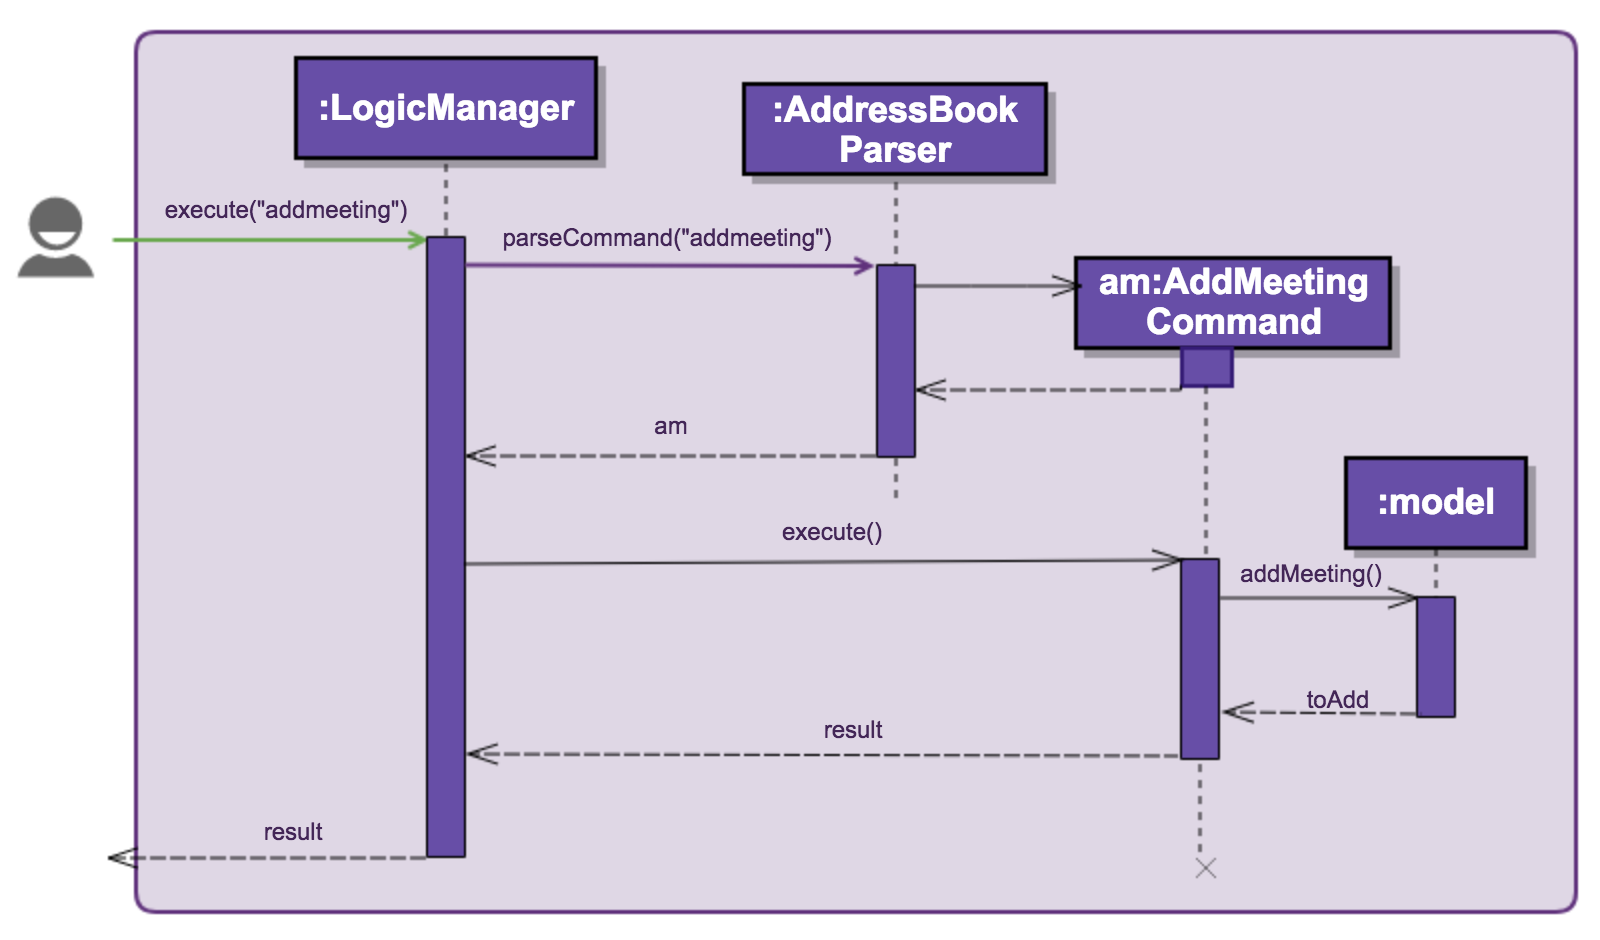
Figure 5.5.1 : Sequence diagram of Add Meeting
5.6. Delete Meeting
The delete meeting command inherits from UndoableCommand which allows user to delete meeting with the following parameters: 'INDEX' of meeting in the meeting list.
Implementation:
When the deletemeeting command is called with the appropriate parameters, the instance of the Meeting object created during addmeeting
is called upon and removed.
For example,
deletemeeting 1Deletes an object with the following parameters
INDEX: 1The INDEX of meeting provides the name, date and location of the meeting which is used to remove it
from the meeting list.
5.7. List Meeting
The delete meeting command inherits from UndoableCommand which allows user to list meeting with the following parameters: 'lm'
Implementation:
When the listmeeting command is called, the latest MeetingList is called and shown.
For example,
lm5.8. Find Meeting
The find meeting command inherits from Command which allows users to find meeting with the following parameters: [KEYWORD] of the meeting in the meeting list.
Implementation:
When the findmeeting command is called with the appropriate parameters, a search for the instance of the Meeting object created during addmeeting
with keywords are listed.
For example,
findmeeting makanFinds an object with the following parameters
KEYWORD: makanThe KEYWORD of meeting provides the name, date and location of the meeting which is used to list it.
If none of the meetings contains the KEYWORD, the results would show "No meetings found".
5.9. Find Exact Meeting
The find exact meeting command inherits from Command which allows users to find meetings in the meeting list with persons whose name matches the [PHRASE].
Implementation:
When the findexactmeeting command is called with the appropriate parameters, a search for the instance of the Meeting object.
The following sequence diagram shows how the command works:

Figure 5.8.1 : Find Exact Meeting Sequence Diagram
For example,
findexactmeeting john tanFinds a meeting(s) with the following parameter as the name of the person stored in meeting
PHRASE: john tanIf none of the meetings contains the PHRASE, the results would show "No meetings found".
5.9.1. Design Considerations
Aspect: How to narrow down search results
Alternative 1: reducing the number of search results when more keywords are added
Pros: Allows more flexibility when searching for a specific meeting
Cons Might not be able to sufficiently narrow down search results when there is a large amount of meetings stored
Current Choice : Searching based on the entire name of a person
Pros: Able to significantly reduce the amount of meetings listed
Cons Restricts user to only search using one field
5.10. Edit Meeting
The edit meeting command is an undoable command which allows the user to edit the MeetingName, DateTime or Place of
a created Meeting object.
Implementation:
When the editmeeting command is called with the appropriate parameters given, an instance of the Meeting object is created
with the corresponding parameters. For example,
editmeeting 2 n/Lunch l/Jurong East MallCreates an object with the following parameters
MeetingName:Lunch
DateTime: null
Place: Jurong East Mall
This instance of the object Meeting is then compared to the preexisting Meetings in the addressbook corresponding
to the index that was given in the command line which for the example above is Index 2. The respective parameters
will then be replaced accordingly with the ones that were instantiated. As shown also, parameters that were not declared
(in the case of the example, it was DateTime), are defaulted to be null and will not be changed in the actual Meeting
object.
When given invalid inputs, the editmeeting command shares some of the exceptions
which are also thrown by the addmeeting command. They are:
-
DuplicateMeetingException: Compares the edited Meeting object with the other Meeting objects in the address book and this exception is thrown when there is a duplicate object with the same parameters. -
MeetingNotFoundException: Exception is thrown when the index provided to theeditmeetingcommand is referring to the invalid index of aMeetingobject in the addressbook -
MeetingBeforeCurrDateException: Exception is thrown when the date of the edited Meeting is earlier than that of the current system time, this exception is thrown. -
MeetingClashException: Exception is thrown when the DateTime of the editedmeeting is the same as one of the preexisting Meetings in the addressbook.
5.10.1. Design Considerations
Aspect: how EditMeetingCommand executes
Alternative 1 : Comparing the different parameters individually without the creation
of a new instance of a Meeting
Pros: More direct and faster way of editing the different parameters of the Meeting object
5.11. Edit Meeting
The edit meeting command is an undoable command which allows the user to edit the MeetingName, DateTime or Place of
a created Meeting object.
Implementation:
When the editmeeting command is called with the appropriate parameters given, an instance of the Meeting object is created
with the corresponding parameters. For example,
editmeeting 2 n/Lunch l/Jurong East MallCreates an object with the following parameters
MeetingName:Lunch
DateTime: null
Place: Jurong East Mall
This instance of the object Meeting is then compared to the preexisting Meetings in the addressbook corresponding
to the index that was given in the command line which for the example above is Index 2. The respective parameters
will then be replaced accordingly with the ones that were instantiated. As shown also, parameters that were not declared
(in the case of the example, it was DateTime), are defaulted to be null and will not be changed in the actual Meeting
object.
When given invalid inputs, the editmeeting command shares some of the exceptions
which are also thrown by the addmeeting command. They are:
-
DuplicateMeetingException: Compares the edited Meeting object with the other Meeting objects in the address book and this exception is thrown when there is a duplicate object with the same parameters. -
MeetingNotFoundException: Exception is thrown when the index provided to theeditmeetingcommand is referring to the invalid index of aMeetingobject in the addressbook -
MeetingBeforeCurrDateException: Exception is thrown when the date of the edited Meeting is earlier than that of the current system time, this exception is thrown. -
MeetingClashException: Exception is thrown when the DateTime of the editedmeeting is the same as one of the preexisting Meetings in the addressbook.
5.11.1. Design Considerations
Aspect: how EditMeetingCommand executes
Alternative 1: Comparing the different parameters individually without the creation
of a new instance of a Meeting
Pros: More direct and faster way of editing the different parameters of the Meeting object
Cons: Unable to check for invalid fields of later inputs
Current Choice: Creating a new edited meeting object before modifying the one in the database.
Pros: Able to check if edited fields are valid
Cons: Involves the creation of new objects, possibly longer run time
5.12. Select Meeting
The select meeting command inherits from Command which allows user to select a meeting with the following parameters: 'INDEX' of meeting in the last meeting listing.
Implementation:
When the selectmeeting is called with the appropriate parameters given, the Events center would create and post an instance of this as a new request event.
This request event is then handled by the Browser Panel which loads the designated meeting page, Google Maps, with the meeting location loaded into the
destination.
5.12.1. Design Considerations
Aspect: Purpose and use for selecting a meeting
Alternative 1 (current implementation): Google Maps is loaded in the browser panel
Pros: Allows developer to make use of the already established Google Maps.
Cons: Requires user to input valid addresses instead of user-based inputs like "Alex’s Home".
Alternative 2 (future option): Allows user to choose what to load at the browser panel such as connecting to social media platforms to interact with meeting partners
Pros: Improve flexibility and choices to suit different needs of users.
5.13. Meeting Card
The implementation of meeting card starts of from creating 'Meeting' class which resides in the Model component of this application. This meeting card also requires the UI component for this cards to be properly shown to the users.
-
Firstly, the Meeting class is created with object properties like
MeetingName,DateTime,Place,PersonToMeetandPhoneNum. We want all these object properties to facilitate the users' ability to retrieve these information of his/her scheduled meeting. This is handled by ModelManager. -
These object properties of the meeting class are assigned to the labels in the Meeting card of MeetingCard.java, handled by UI manager.
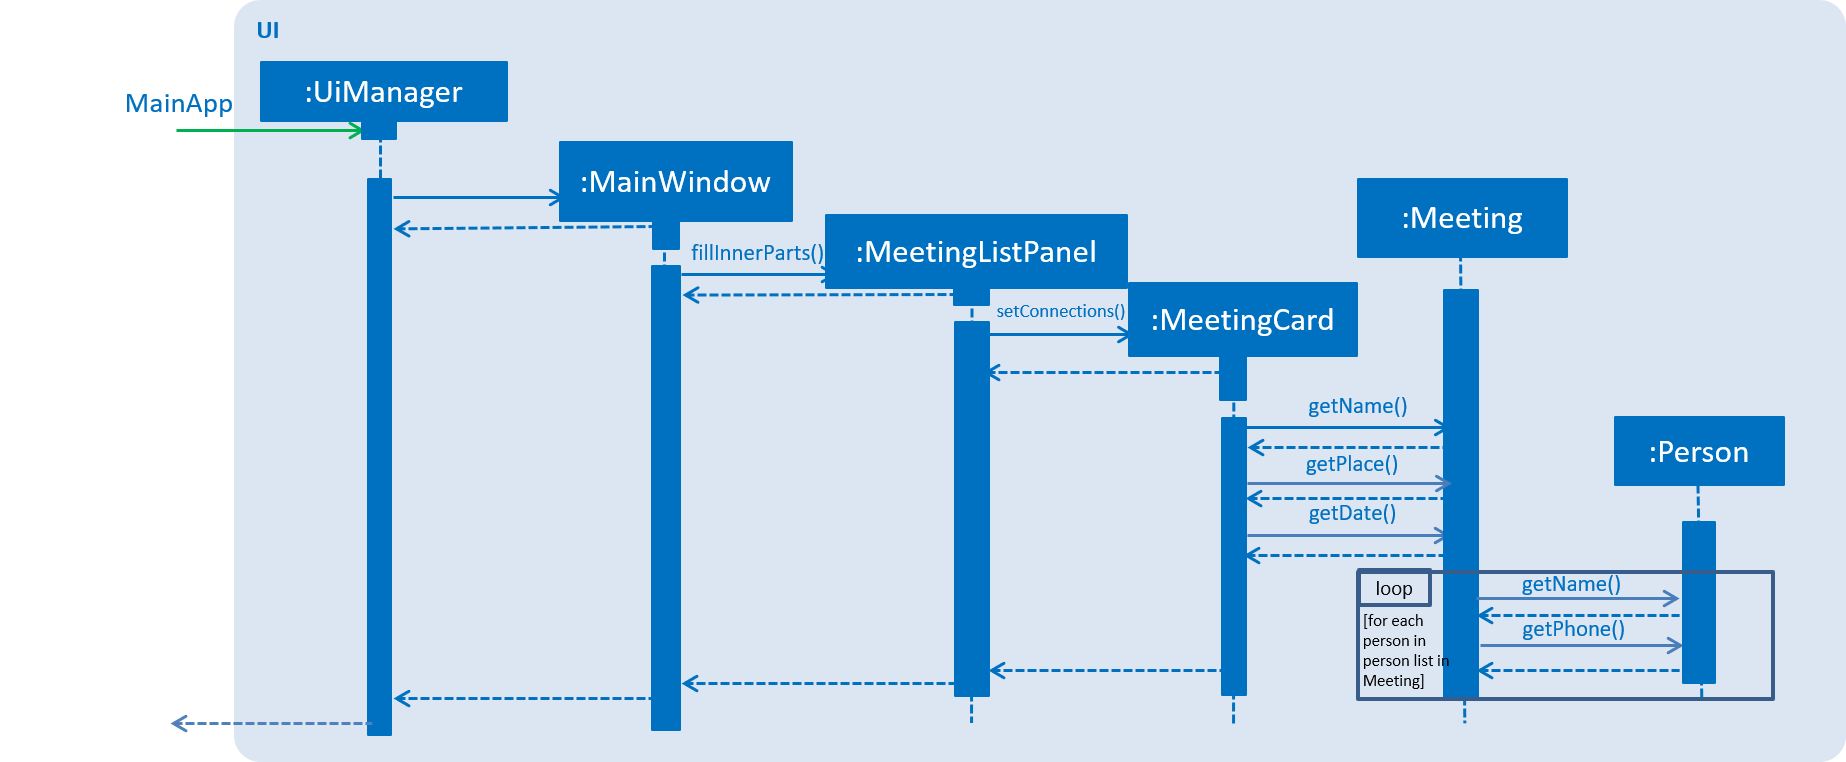
Figure 5.12.1 : Sequence diagram of Ui of Meeting Card
-
The list of meeting cards are assigned to the panel at the right of the program. The list are created with 'UniqueMeetingList'. This list of meetings are always sorted according to date and time, with the nearest date and time first. The implementation of the sorting of this
Meetingcards is by using lambda sort, where theLocalDateTimeof theDateTimeinMeetingare sorted.

Figure 5.12.2 : Meeting Card
To show the urgency of the meeting, as you can see from the examples below, colours are assigned to the card by comparing the date and time in the meeting class to the date and time of the log in.
-
darkRed: Meeting is in next 24 hours.
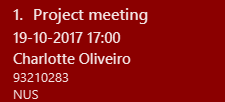
Figure 5.12.3 : Meeting card that due within 24 hours
-
red: Meeting is in next 48 hours.

Figure 5.12.4 : Meeting Card that due within 48 hours
-
orangeRed: Meeting is in next 72 hours.
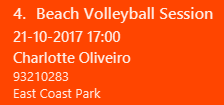
Figure 5.12.5 : Meeting Card that due within 72 hours
5.13.1. Design Considerations
Aspect: Ways to be implemented as a reminder of the urgency of the meeting
Alternative 1 (current choice): Colour is applied to meeting card
Pros: Easy to implement but further developers can enhance the colors easily.
Cons: Might not be as appealing to some users.
Alternative 2 (future choice): A pop-up reminder to show meeting on the current day and with the colours applied to meeting card
Pros: Will be a better reminder to users.
5.14. Meeting pop up reminder
To maximise the ability to remind the users of their meetings, a pop up reminder with the details of the meetings are shown to the user. The user will just have to acknowledge it. The pop up reminder activates and provides the details of the users' next meeting in 24 hours. As you can see from the Figure 5.8.1, there are sufficient details of the next meeting and the extra button is for the user to confirm the reminder.
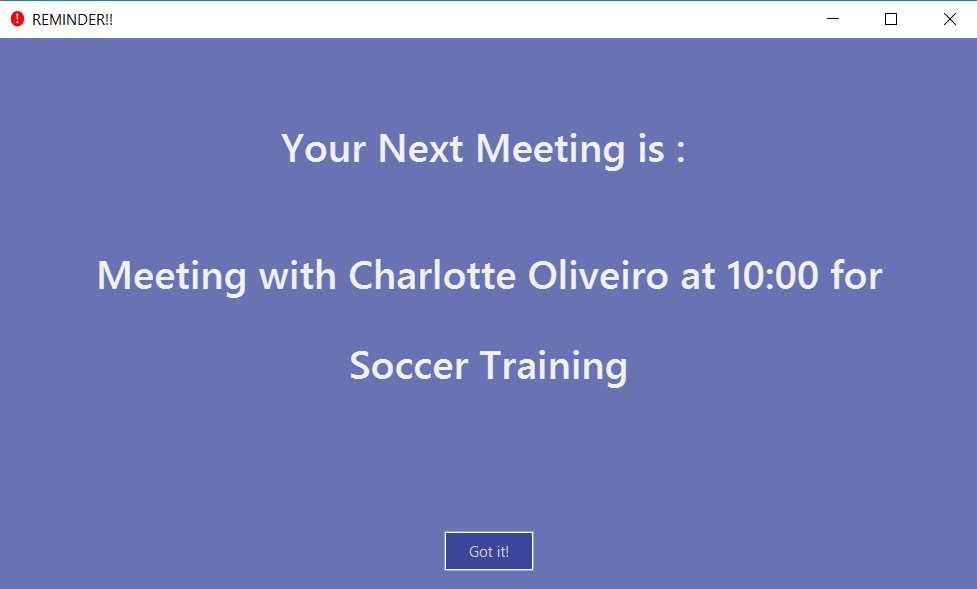
Figure 5.13.1 : Reminder for single meeting
Implementation:
The creation of the pop up starts if there is a meeting on the day itself by the calling of MeetingAlert class during the opening of the application. The implementation of meeting pop up reminder ultilises javafx.stage.Stage. Before the instantiation of the MeetingAlert class, there will be a check if the next meeting is a group meeting or normal meeting. Subsequently, the results will be shown on the reminder itself, shown in Figure 5.8.2.
.png)
Figure 5.13.2 : Reminder for group meeting
5.14.1. Design Considerations
Aspect: Ways to be implemented as a reminder of the urgency of the meeting
Alternative 1 (current choice): A pop-up reminder to show meeting on the current day, furthermore working with the colours applied to meeting card
Pros: Will be a better reminder to users and easy to implement
Cons: Might not be as appealing to some users.
Alternative 2 : Scrap the colours indicators for individual cards
Pros: Might be more appealing to some users.
Cons: Colour cards itself might not be significant enough to remind the users
5.15. Automatic Deletions of Meetings
Since, meetings that have been attended or missed are not needed in the meeting reminders anymore, we found a need for ScheduBook to manage the meetings and delete them, without the need for user to manually delete them.
Implementation:
When ScheduBook is being booted up, the application loads up addressbook.xml file which stores the record of the saved file from the previous boot up of ScheduBook. Hence, using LocalDateTime classes and methods, any meetings that have dates before the time the user boot up ScheduBook will not be added to the filteredMeetingList that is used to replace the pre-loaded list as you can see in the code snippet below. Hence, the newest list will not include those meetings and further saved back to the addressbook.xml file when user shut down ScheduBook.
for (final ReadOnlyMeeting meeting : meetings) {
            if (dateIsAfter((meeting.getDate().toString()))) {
            //to delete meetings that have passed automatically
                replacement.add(new Meeting(meeting));
            }
        }
private boolean dateIsAfter (String date) {
        DateTimeFormatter formatter = DateTimeFormatter.ofPattern("dd-MM-yyyy HH:mm");
        LocalDateTime currDate = LocalDateTime.now();
        LocalDateTime meetDate = LocalDateTime.parse(date, formatter);
        if (meetDate.isAfter((currDate))) {
            return true;
        }
        return false;
    }
5.15.1. Design Considerations
Aspect: Ways to handle meetings that have passed the scheduled date and time
Alternative 1 (current choice): Application automatically deletes all meetings that have passed the scheduled time
Pros: User-friendly, past meetings will not obstruct the user’s usage, hence being more organised
Cons: Some users might want to save some meetings that they missed
Alternative 2 (future choice) : Have an extra tabs that stores and saves meetings that user indicates to
Pros: Satisfy the need for some user to store 'missed' meetings
Alternative 3 : Let the users handle the meetings themselves
Pros: More freedom of choice, to manage the meetings
Cons: More troublesome for users, less user-friendly
6. Documentation
We use asciidoc for writing documentation.
| We chose asciidoc over Markdown because asciidoc, although a bit more complex than Markdown, provides more flexibility in formatting. |
6.1. Editing Documentation
See UsingGradle.adoc to learn how to render .adoc files locally to preview the end result of your edits.
Alternatively, you can download the AsciiDoc plugin for IntelliJ, which allows you to preview the changes you have made to your .adoc files in real-time.
6.2. Publishing Documentation
See UsingTravis.adoc to learn how to deploy GitHub Pages using Travis.
6.3. Converting Documentation to PDF format
We use Google Chrome for converting documentation to PDF format, as Chrome’s PDF engine preserves hyperlinks used in webpages.
Here are the steps to convert the project documentation files to PDF format.
-
Follow the instructions in UsingGradle.adoc to convert the AsciiDoc files in the
docs/directory to HTML format. -
Go to your generated HTML files in the
build/docsfolder, right click on them and selectOpen with→Google Chrome. -
Within Chrome, click on the
Printoption in Chrome’s menu. -
Set the destination to
Save as PDF, then clickSaveto save a copy of the file in PDF format. For best results, use the settings indicated in the screenshot below.
Figure 6.3.1 : Saving documentation as PDF files in Chrome
7. Testing
7.1. Running Tests
There are three ways to run tests.
| The most reliable way to run tests is the 3rd one. The first two methods might fail some GUI tests due to platform/resolution-specific idiosyncrasies. |
Method 1: Using IntelliJ JUnit test runner
-
To run all tests, right-click on the
src/test/javafolder and chooseRun 'All Tests' -
To run a subset of tests, you can right-click on a test package, test class, or a test and choose
Run 'ABC'
Method 2: Using Gradle
-
Open a console and run the command
gradlew clean allTests(Mac/Linux:./gradlew clean allTests)
| See UsingGradle.adoc for more info on how to run tests using Gradle. |
Method 3: Using Gradle (headless)
Thanks to the TestFX library we use, our GUI tests can be run in the headless mode. In the headless mode, GUI tests do not show up on the screen. That means the developer can do other things on the Computer while the tests are running.
To run tests in headless mode, open a console and run the command gradlew clean headless allTests (Mac/Linux: ./gradlew clean headless allTests)
7.2. Types of tests
We have two types of tests:
-
GUI Tests - These are tests involving the GUI. They include,
-
System Tests that test the entire App by simulating user actions on the GUI. These are in the
systemtestspackage. -
Unit tests that test the individual components. These are in
seedu.address.uipackage.
-
-
Non-GUI Tests - These are tests not involving the GUI. They include,
-
Unit tests targeting the lowest level methods/classes.
e.g.seedu.address.commons.StringUtilTest -
Integration tests that are checking the integration of multiple code units (those code units are assumed to be working).
e.g.seedu.address.storage.StorageManagerTest -
Hybrids of unit and integration tests. These test are checking multiple code units as well as how the are connected together.
e.g.seedu.address.logic.LogicManagerTest
-
7.3. Troubleshooting Testing
Problem: HelpWindowTest fails with a NullPointerException.
-
Reason: One of its dependencies,
UserGuide.htmlinsrc/main/resources/docsis missing. -
Solution: Execute Gradle task
processResources.
8. Dev Ops
8.1. Build Automation
See UsingGradle.adoc to learn how to use Gradle for build automation.
8.2. Continuous Integration
We use Travis CI and AppVeyor to perform Continuous Integration on our projects. See UsingTravis.adoc and UsingAppVeyor.adoc for more details.
8.3. Making a Release
Here are the steps to create a new release.
-
Update the version number in
MainApp.java. -
Generate a JAR file using Gradle.
-
Tag the repo with the version number. e.g.
v0.1 -
Create a new release using GitHub and upload the JAR file you created.
8.4. Managing Dependencies
A project often depends on third-party libraries. For example, Address Book depends on the Jackson library for XML parsing. Managing these dependencies can be automated using Gradle. For example, Gradle can download the dependencies automatically, which is better than these alternatives.
a. Include those libraries in the repo (this bloats the repo size)
b. Require developers to download those libraries manually (this creates extra work for developers)
Appendix A: Suggested Programming Tasks to Get Started
Suggested path for new programmers:
-
First, add small local-impact (i.e. the impact of the change does not go beyond the component) enhancements to one component at a time. Some suggestions are given in this section Improving a Component.
-
Next, add a feature that touches multiple components to learn how to implement an end-to-end feature across all components. The section Creating a new command:
remarkexplains how to go about adding such a feature.
A.1. Improving each component
Each individual exercise in this section is component-based (i.e. you would not need to modify the other components to get it to work).
Logic component
Do take a look at the Design: Logic Component section before attempting to modify the Logic component.
|
-
Add a shorthand equivalent alias for each of the individual commands. For example, besides typing
clear, the user can also typecto remove all persons in the list.
Model component
Do take a look at the Design: Model Component section before attempting to modify the Model component.
|
-
Add a
removeTag(Tag)method. The specified tag will be removed from everyone in the address book.
Ui component
Do take a look at the Design: UI Component section before attempting to modify the UI component.
|
-
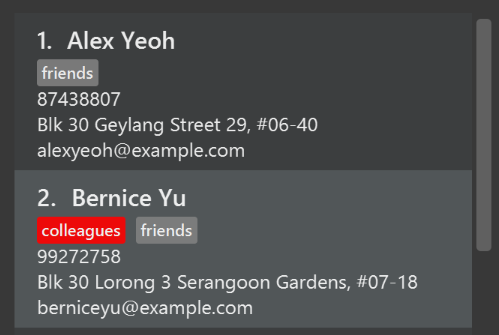
Use different colors for different tags inside person cards. For example,
friendstags can be all in grey, andcolleaguestags can be all in red.Before
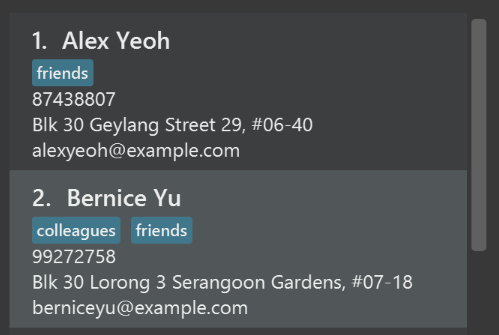
After
-
Modify
NewResultAvailableEventsuch thatResultDisplaycan show a different style on error (currently it shows the same regardless of errors).Before
After
-
Modify the
StatusBarFooterto show the total number of people in the address book.Before

After

Storage component
Do take a look at the Design: Storage Component section before attempting to modify the Storage component.
|
-
Add a new method
backupAddressBook(ReadOnlyAddressBook), so that the address book can be saved in a fixed temporary location.
A.2. Creating a new command: remark
By creating this command, you will get a chance to learn how to implement a feature end-to-end, touching all major components of the app.
A.2.1. Description
Edits the remark for a person specified in the INDEX.
Format: remark INDEX r/[REMARK]
Examples:
-
remark 1 r/Likes to drink coffee.
Edits the remark for the first person toLikes to drink coffee. -
remark 1 r/
Removes the remark for the first person.
A.2.2. Step-by-step Instructions
[Step 1] Logic: Teach the app to accept 'remark' which does nothing
Let’s start by teaching the application how to parse a remark command. We will add the logic of remark later.
Main:
-
Add a
RemarkCommandthat extendsUndoableCommand. Upon execution, it should just throw anException. -
Modify
AddressBookParserto accept aRemarkCommand.
Tests:
-
Add
RemarkCommandTestthat tests thatexecuteUndoableCommand()throws an Exception. -
Add new test method to
AddressBookParserTest, which tests that typing "remark" returns an instance ofRemarkCommand.
[Step 2] Logic: Teach the app to accept 'remark' arguments
Let’s teach the application to parse arguments that our remark command will accept. E.g. 1 r/Likes to drink coffee.
Main:
-
Modify
RemarkCommandto take in anIndexandStringand print those two parameters as the error message. -
Add
RemarkCommandParserthat knows how to parse two arguments, one index and one with prefix 'r/'. -
Modify
AddressBookParserto use the newly implementedRemarkCommandParser.
Tests:
-
Modify
RemarkCommandTestto test theRemarkCommand#equals()method. -
Add
RemarkCommandParserTestthat tests different boundary values forRemarkCommandParser. -
Modify
AddressBookParserTestto test that the correct command is generated according to the user input.
[Step 3] Ui: Add a placeholder for remark in PersonCard
Let’s add a placeholder on all our PersonCard s to display a remark for each person later.
Main:
-
Add a
Labelwith any random text insidePersonListCard.fxml. -
Add FXML annotation in
PersonCardto tie the variable to the actual label.
Tests:
-
Modify
PersonCardHandleso that future tests can read the contents of the remark label.
[Step 4] Model: Add Remark class
We have to properly encapsulate the remark in our ReadOnlyPerson class. Instead of just using a String, let’s follow the conventional class structure that the codebase already uses by adding a Remark class.
Main:
-
Add
Remarkto model component (you can copy fromAddress, remove the regex and change the names accordingly). -
Modify
RemarkCommandto now take in aRemarkinstead of aString.
Tests:
-
Add test for
Remark, to test theRemark#equals()method.
[Step 5] Model: Modify ReadOnlyPerson to support a Remark field
Now we have the Remark class, we need to actually use it inside ReadOnlyPerson.
Main:
-
Add three methods
setRemark(Remark),getRemark()andremarkProperty(). Be sure to implement these newly created methods inPerson, which implements theReadOnlyPersoninterface. -
You may assume that the user will not be able to use the
addandeditcommands to modify the remarks field (i.e. the person will be created without a remark). -
Modify
SampleDataUtilto add remarks for the sample data (delete youraddressBook.xmlso that the application will load the sample data when you launch it.)
[Step 6] Storage: Add Remark field to XmlAdaptedPerson class
We now have Remark s for Person s, but they will be gone when we exit the application. Let’s modify XmlAdaptedPerson to include a Remark field so that it will be saved.
Main:
-
Add a new Xml field for
Remark. -
Be sure to modify the logic of the constructor and
toModelType(), which handles the conversion to/fromReadOnlyPerson.
Tests:
-
Fix
validAddressBook.xmlsuch that the XML tests will not fail due to a missing<remark>element.
[Step 7] Ui: Connect Remark field to PersonCard
Our remark label in PersonCard is still a placeholder. Let’s bring it to life by binding it with the actual remark field.
Main:
-
Modify
PersonCard#bindListeners()to add the binding forremark.
Tests:
-
Modify
GuiTestAssert#assertCardDisplaysPerson(…)so that it will compare the remark label. -
In
PersonCardTest, callpersonWithTags.setRemark(ALICE.getRemark())to test that changes in thePerson's remark correctly updates the correspondingPersonCard.
[Step 8] Logic: Implement RemarkCommand#execute() logic
We now have everything set up… but we still can’t modify the remarks. Let’s finish it up by adding in actual logic for our remark command.
Main:
-
Replace the logic in
RemarkCommand#execute()(that currently just throws anException), with the actual logic to modify the remarks of a person.
Tests:
-
Update
RemarkCommandTestto test that theexecute()logic works.
A.2.3. Full Solution
See this PR for the step-by-step solution.
Appendix B: User Stories
Priorities: High (must have) - * * *, Medium (nice to have) - * *, Low (unlikely to have) - *
| Priority | As a … | I want to … | So that I can… |
|---|---|---|---|
|
new user |
see usage instructions |
refer to instructions when I forget how to use the App |
|
user |
add a new person |
|
|
user |
delete a person |
remove entries that I no longer need |
|
user |
view the history of commands |
check my previous commands |
|
user |
undo the previous command |
revert my changes |
|
user |
edit the particulars of a person |
I can update or make amendments to the particulars of any contact |
|
user |
add multiple Tags to a person |
I can filter and search for contacts with a particular keyword in their tagNames |
|
user |
list out every contact’s information at once |
retrieve information of all my contacts |
|
user |
clear all contacts |
have an empty AddressBook |
|
lazy user |
I want my meeting list to clear outdated meeting |
I do not have to delete them myself |
|
user |
I want my meetings to be sorted according to nearest date |
I don’t have to find the more important meetings ( which have the closer dates) |
|
lazy user |
I want to be reminded by Meeting cards |
I know I have meeting for the next few days |
|
user |
redo the previously undone command |
retrieve the previous change |
|
user |
find a person by name |
locate details of persons without having to go through the entire list |
|
heavy user |
use commands in short forms |
input and execute my commands faster |
|
heavy user |
schedule meetings with the contacts |
have a record and be reminded on when I am meeting them |
|
user |
hide private contact details by default |
minimize chance of someone else seeing them by accident |
|
new user |
view the list of all commands available |
I can understand the functions of each command |
|
forgetful user |
add multiple Tags to each contact |
in case I forget the person’s name, his or her contact can still be found through keywords in their Tags |
|
frequent user |
save School Email Address(sub-email) to a contact |
I can access the person’s school email if required |
|
frequent user |
create groups for contacts according to the keywords in their Tags |
I can view all the contacts of each group with one search |
|
user that is bad at recalling people by their name |
insert(or link) a picture of the person |
I can double check that I retrieved the correct contact and also help me to recall how the person looks like |
|
lazy and forgetful user |
filter contacts by certain fields with keywords |
still filter and search with certain keywords of other field instead of name only |
|
user with many persons in the address book |
sort persons by name |
locate a person easily |
|
heavy user |
save Office address (sub-address) to a contact |
have information about his/her office address if I need it |
{More to be added}
Appendix C: Use Cases
(For all use cases below, the System is the AddressBook and the Actor is the user, unless specified otherwise)
Use case: Delete person
MSS
-
User requests to list persons
-
AddressBook shows a list of persons
-
User requests to delete a specific person in the list
-
AddressBook deletes the person
Use case ends.
Extensions
-
2a. The list is empty.
Use case ends.
-
3a. The given index is invalid.
-
3a1. AddressBook shows an error message.
Use case resumes at step 2.
-
Use case: View history
MSS
-
User requests to view history of commands
-
AddressBook shows a list of previously entered commands
Use case ends.
Use case: Undo
MSS
-
User requests to undo the previous command
-
AddressBook undo the previous command
Use case ends.
Extensions
-
1a. There are no more commands to undo.
-
1a1. AddressBook shows an error message.
Use case ends.
-
{More to be added}
Use case: List
MSS
-
User requests to list persons
-
AddressBook shows a list of persons
Use case ends.
Extensions
-
2a. The list is empty.
Use case ends.
Use case: Clear
MSS
-
User request to clear AddressBook
-
AddressBook clears the list of person
Use case ends.
Use case: Redo
MSS
-
User request to redo previous undone command
-
AddressBook redo the previous undone command
Use case ends.
Extensions
-
2a. There is no previous undone command to redo
-
2a1. AddressBook shows an error message.
Use case ends.
-
Use case: Schedule meeting with person
MSS
-
User requests to find person with name keywords
-
AddressBook shows a list of persons with keywords
-
User requests to add meeting of a specific person in the list
-
AddressBook adds the meeting
-
AddressBook sorts the meeting list
-
AddressBook shows lists of meetings
Use case ends.
Extensions
-
2a. The list is empty.
Use case ends.
-
3a. The given index is invalid.
-
3a1. AddressBook shows an error message.
Use case resumes at step 2.
-
Use case: ListMeeting
MSS
-
User requests to list meetings
-
AddressBook shows a list of meetings
Use case ends.
Extensions
-
2a. The list is empty.
Use case ends.
Appendix D: Non Functional Requirements
-
Should work on any mainstream OS as long as it has Java
1.8.0_60or higher installed. -
Should be able to hold up to 1000 persons without a noticeable sluggishness in performance for typical usage.
-
A user with above average typing speed for regular English text (i.e. not code, not system admin commands) should be able to accomplish most of the tasks faster using commands than using the mouse.
{More to be added}
Appendix E: Glossary
Mainstream OS
Windows, Linux, Unix, OS-X
Private contact detail
A contact detail that is not meant to be shared with others
Appendix F: Product Survey
Product Name
Author: …
Pros:
-
…
-
…
Cons:
-
…
-
…